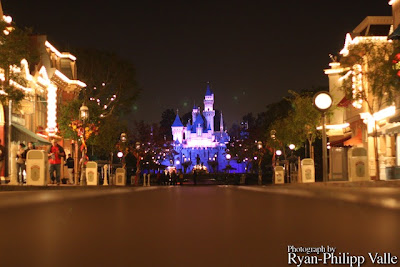
 I like this image for two reasons: Main Street, USA is empty and secondly, I used High Dynamic Range (or HDR for short) techniques to make this image. So what is HDR? Well, typically, a camera doesn't see the same dynamics the human eyes see. Often, when you take a picture (with no flash), areas that appear dark in person will come out too dark (or sometimes just purely black) in a photo or anything that is bright in person, wil appear blown out in a photograph. This ends up resulting in a photograph where subjects have a huge contrast between light and dark objects, to not be able to be photographed. This is where HDR photography techniques come in.
 Pretty much, to solve this issue I am having, I take multiple photographs of the same subject from the same angle, however, I change the exposure each time I take a photo to accommodate for the dark, midtone, and bright areas. Once on the computer, I combine the three using specialized software (for me, I use Photomatrix Pro) to get the three images combined into one. Now, in some cases, the change may not be too drastic, like the image I posted above, but in others, you can get a noticeable difference.
For the image above, I shot it using my 50mm lens at full f/1.8 opening. I then took three different exposures. The light meter's normal reading was at 1/30th and I did two more automatic shots using my camera's feature which adjusted for -2 and +2 exposure time, giving me some rough shots which exposed for dark areas and bright areas of the scene. In an ideal world where I can retake this image, I would've adjusted my highlight-priority shot or added a forth shot which exposed for the bright signs of the buildings. In the image above, they are heavily blown out, but had I exposed for them, they could've looked more natural.
At the end of it all, you can get a very surreal looking image or even an image which looks more natural and accurate to what you saw in person. It all depends on the settings you used.
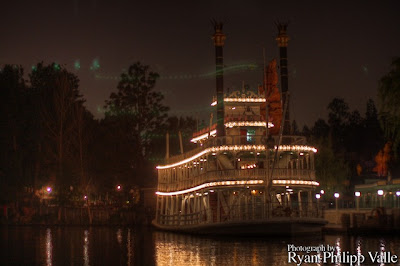
Here's another HDR image I took. This time, it's the Mark Twain riverboat. I used the same techniques as I did for the castle above. Because of HDR, I was able to attain greater detail from inside the boat and also the trees are able to be seen without the main ship being blown out.
 Now you may be wondering what those lights are up front. That's a glare I was getting from my lens filter. Just a slight warning, if you use a UV filter (or any kind of filter) to protect your lens, be prepared to get unwanted reflections on your final image.
I'm really enjoying your blog. What a great tip! Now I see that Photoshop has an HDR tool built right in. Awesome! Thanks for sharing.
ReplyDelete