Wednesday, September 30, 2009

Technique of the Day: High Dynamic Range Photography

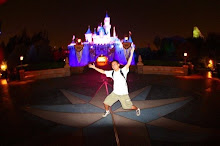
I like this image for two reasons: Main Street, USA is empty and secondly, I used High Dynamic Range (or HDR for short) techniques to make this image. So what is HDR? Well, typically, a camera doesn't see the same dynamics the human eyes see. Often, when you take a picture (with no flash), areas that appear dark in person will come out too dark (or sometimes just purely black) in a photo or anything that is bright in person, wil appear blown out in a photograph. This ends up resulting in a photograph where subjects have a huge contrast between light and dark objects, to not be able to be photographed. This is where HDR photography techniques come in.

Pretty much, to solve this issue I am having, I take multiple photographs of the same subject from the same angle, however, I change the exposure each time I take a photo to accommodate for the dark, midtone, and bright areas. Once on the computer, I combine the three using specialized software (for me, I use Photomatrix Pro) to get the three images combined into one. Now, in some cases, the change may not be too drastic, like the image I posted above, but in others, you can get a noticeable difference.

For the image above, I shot it using my 50mm lens at full f/1.8 opening. I then took three different exposures. The light meter's normal reading was at 1/30th and I did two more automatic shots using my camera's feature which adjusted for -2 and +2 exposure time, giving me some rough shots which exposed for dark areas and bright areas of the scene. In an ideal world where I can retake this image, I would've adjusted my highlight-priority shot or added a forth shot which exposed for the bright signs of the buildings. In the image above, they are heavily blown out, but had I exposed for them, they could've looked more natural.

At the end of it all, you can get a very surreal looking image or even an image which looks more natural and accurate to what you saw in person. It all depends on the settings you used.

Here's another HDR image I took. This time, it's the Mark Twain riverboat. I used the same techniques as I did for the castle above. Because of HDR, I was able to attain greater detail from inside the boat and also the trees are able to be seen without the main ship being blown out.

Now you may be wondering what those lights are up front. That's a glare I was getting from my lens filter. Just a slight warning, if you use a UV filter (or any kind of filter) to protect your lens, be prepared to get unwanted reflections on your final image.


Photo of the Day: A Knight in Not So Shining Armor


Disneyland store windows are filled with great decorations and what not which lots of people don't notice and that is the main reason why I like this photo. This was taken in a shop within Fantasyland. I can't recall exactly what the store's called, but it's a medieval shop right behind the castle.

With my 50mm lens at hand, I shot this at night at full aperture opening of f/1.8. With an ISO of 400, I was able to get the shot with very low grain, but surprisingly, I was still able to shoot at 1/50 for the shutter. It was nice that Disneyland lights it up properly and perhaps explains the final look of this image. Remember, a camera only captures the light it sees, so if something is lit well, it is more likely to come out looking good. This picture serves as that example.

Tuesday, September 29, 2009

Random Photo: Corridor of Goons


I personally like this photo because of the "mysteriousness" it carries in the image. The text "Corridor of Goons" and the bokeh the image has along with the color tone gives it this mood that I like and feel is fitting for the subject seen in the photo.

Like the other photos in this blog, this was taken at Disneyland. To be more exact, this is inside the Sleeping Beauty Castle Walkthrough. With my 50mm f/1.8 lens at hand, I shot this image at full opening of f/1.8 using a shutter of 1/13. That is quite slow, but teamed up with an ISO of 1600 and a nearby wall, I was able to stabilize myself fairly well to be able to take this image.

The use of walls, floors, poles, and anything around me is something I am big on. I find tripods to be helpful, but because they're so bulky, and the fact that I am a hobbyist and not getting any income from these photos, I don't feel the need or want to carry a tripod with me to get steady shots. Instead, I get creative and I suggest that you do too, and find things that can be used as a tripod. Within Disneyland, I know that there is plenty to use. However, if you are taking a telephoto image at a slow shutter, say the 1/13th I used in this photo, or even something around 1/30th or 1/40th, would result in blur, so in that case, you may way to use a tripod. There are some exceptions to my rule of being anti-tripod and telephoto lenses are one of those exceptions.

It's something I haven't had to worry about yet as I don't own a long telephoto (longest I have is a 105mm) so I can't give many tips on that. You are free to try my methodology of environmental tripods, but I won't guarantee them to work. If you find a nice and easy way to stabilize a telephoto without a tripod, post it in the comment box so you can share it with others reading this :) Thanks.

That is all :)

Ice Cream: Something I've Been Craving

So here's another photo. Perhaps I should re-consider the site name since I definitely am not posting a photo a day. Instead, its more like several photos a day.

Anyways, this photo was taken in Disney's California Adventure by the Paradise Pier area. From what I recall, this was shot using my Canon 50mm lens at f/3.5, 1/100th shutter at 640 ISO.

I originally shot this as a RAW image with the intention of putting it through some psuedo-HDR post treatment, but while putting it through the necessary processes, it wasn't turning out as I wanted. Instead, heavy grains were appearing due to the high ISO I used and the fact that I only took one exposure. Here's a tip: if doing HDR work, try working with a minimum of 3 different exposures.

At the end of it all, I just did a conversion to jpeg, theoretically changing nothing from what came out of the camera. So once again, this is a "what you see is what I shot" kind of photo.

TwoForTuesdays: Mr. Lighting McQueen

It's tuesday, so I feel like doing two pictures for today.

This photo was taken on February 22, 2009 using a very inexpensive, but great lens - the Canon 50mm f/1.8. If you have a canon eos slr camera using EF mounts, then I highly suggest you get one of these if you haven't done so already. It's a fast lens which shoots quality pictures for a mere $99, possibly cheaper if you go bargain shopping.

This photo, though taken with an f/1.8 lens, was shot at f/3.5 at 1/80 for the shutter. Surprisingly, I used ISO 800 for this which I now thing is quite high. It might've been possibly that I did a poor job in changing over my settings when going from an indoor setting, which typically is darker at Disney, to an outdoor setting.

I am happy with what I took on that day, happy enough to not need to apply any correction on it from the computer, making it a "what you see is what I took" picture.

Photo of the Day: A Shrunken Head?


Disney pays a lot of attention to detail when it comes to their work and design at their theme parks, which leaves to be quite interested and amused at this shrunken head. In my opinion, it's the creepiest thing thee since it's so lifelike but surreal (as in something I would never see in reality). Now where would Disney place a thing like this? Well, I found this little treasure in a store in Adventureland, which if you now think about it, is quite fitting for a shrunken head...well, kind of.

This picture was taken using full manual settings, using my usual 28-105mm lens. It was taken at 105mm at f/4.5, 800 ISO, exposure at 1/80. It was night time, so I had to push it this far since there was very minimal light to take the photograph.

There was no editing done to this picture, with the exception of an addition of a watermark and resizing to fit this website, so what you see is what I took.

Monday, September 28, 2009

A Step Back into History: It's A Small World


Being that this blog is new, I need to populate it with more of my work, so these "A Step back into History" selections may see more than one posting per day.

Once again, this photo was taken with the 28-105mm f/3.5-4.5 lens. It was set at 105mm at f/13 using a shutter speed of 1/200 at 400 ISO. The colors were flat looking once it was on my computer, so using Apple's Aperture software, which I use to manage all my photographs, I adjusted its saturation up a bit and added some contrast. I then added a vignette to give it a different tone which also added emphasis to the gold touches on the facade.

A Step Back into History: Sleeping Beauty Castle


This is one of the first photos I snapped at Disneyland with my camera. It was shot using a my 28-105mm f/3.5-4.5 II USM lens made by Canon set at full 105mm at f/10. It was a bright sunny day so I was able to do that. ISO was set to 200. Once on the computer, and after a few months of taking the photograph, I went back to enhance it a bit by adding some saturation, contrast, and a vignette filter from aperture to come out to this final image you see on screen.

A Photo A Day: Disney Edition

Hello,
Welcome to "A Photo A Day: Disney Edition."

I will be posting one photo per day of a picture I took at Disneyland and share some of the techniques or settings I used to take the photo. I hope you enjoy this.

Just some slight info before you go on reading everything:
I use a Canon 40D camera with the following lenses:
Canon 28-105mm f/3.5-4.5 II USM
Canon 50mm f/1.8 II
Sigma 10mm f/2.8 Fisheye

I use minimally use photoshop to enhance my photos. Once in a while, I may enhance then color-wise in Aperture.

That is it for now. I hope you enjoy. :)

-Ryan